Understanding How Students Schedule Appointments and Interviews
Students access an authenticated CRM Community to schedule appointments or interviews. For more information on configuring a TargetX Appointment Scheduler Community, see TargetX Communities Configuration Overview.
Within the Appointment Scheduler Community, students can:
Access the Appointment Scheduler
- Schedule appointments
- Schedule interviews
Note: If you don't use Interviews, you can disable them via Appointment Scheduler Settings by unchecking the Enable Interviews setting.
Access My Appointments and Interviews
- View or cancel upcoming appointments and interviews.
- Edit Additional Information for upcoming appointments.
- View Past appointments.
- Add upcoming appointments or interviews to their calendar(s)

When accessing the Appointment Scheduler, the following Set of Questions is presented to students when they schedule an appointment:
- If you have configured a custom filter field, the first question will display the custom field and label.
- What is the purpose of the appointment? (Appointment Reason) For details on defining the Appointment Reasons displayed here, see Updating Picklist Values for Appointment Scheduler.
- How would you like to meet? (Meeting Modality)
- Where would you like to meet? (Location) For details on defining the Locations displayed here, see Updating Picklist Values for Appointment Scheduler.
- Who would you like to meet with? (Advisors/Staff/Faculty) For details on defining the Users displayed here, see Setting up Appointment Scheduler users.
If your institution uses Success Teams, and the student has one or more Success Team members assigned with upcoming availability, the student will see My Success Team displayed at the top of the page, along with photos/names of the members of their Success Team:
 |
 |
Students can select the Schedule button next to the Success Team Member to go directly to the appointment's purpose and choose a day/time with the selected Success Team Member. Otherwise, they can select Schedule an Appointment and complete all the questions for an Appointment.
When accessing Interviews, the following options are presented to students when they schedule an interview:
- Type of Interview? (Organization Event/Type)
Note: Only interview 'Types' that have already been added to the Appointment Calendar with a classification of 'Interview' will be available in this list.
- Location of Interview
Note: Interviews must have a location specified to display in searches.
The student-facing Appointment Scheduler will display the Time Zone during the scheduling process and when viewing details for Upcoming or Past appointments. All times will automatically be converted to match the student's chosen Time Zone, which can be set from within the tool during the scheduling flow or from the My Account page.
In some instances, the options available to a student can be limited by the link provided to them by the institution. For more information on restricting student appointment options, see How to determine appointment options using URL parameters.
- After the student answers the question 'What is the purpose of the appointment?', only related Locations for that type of appointment will appear.
- After the student answers the question 'Where would you like to meet?', only related Advisors/Staff/Faculty available for that type of appointment at that location will appear.
- When the appointment selection questions are completed, the student is presented with a calendar view of Available Dates.
- When an available date is selected, the student will be presented with the Available Time Slots.

When an available time slot is selected, the student will be asked to enter any additional information or notes related to this appointment and Confirm.

After confirming, the student will be presented with their Upcoming Appointments page.
Suppose a student attempts to schedule an appointment that conflicts with an existing appointment. In that case, they will receive a warning and have the option to Change the Time or Continue Anyway:
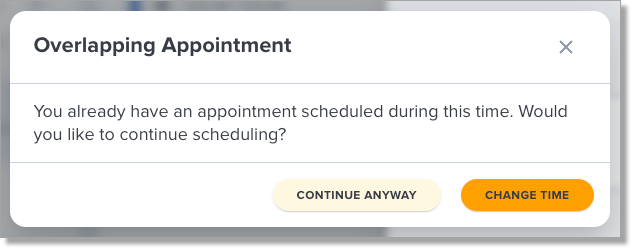
Appointments with Time Conflicts will display an orange badge:

On the My Appointments page, students can choose to:
- Add their upcoming appointment to their calendar(s)
- Edit Additional Information for upcoming appointments
- Cancel their appointment
- View any other upcoming, past, or canceled appointments
- Edit Additional Information for upcoming appointments
- Filter upcoming, past, or canceled appointments and interviews
- A green dot appears under a day with an appointment/interview scheduled. Clicking on the day will filter the right panel to display the appointments and interviews.
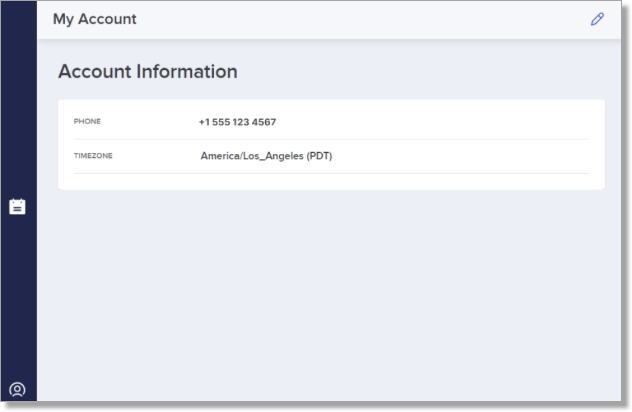
- View My Account to view the Phone Number and Time Zone for appointments. This information is displayed from the student's User record:

Students can return to the My Appointments page at any time.

Appointments with a URL will display a 'clickable' link:

Students who schedule appointments will receive the following communications:
-
Appointment Confirmation
-
Delivered when the student clicks Confirm for the appointment or when an appointment is manually set up by an advisor/staff/faculty on behalf of the student.
-
-
Appointment Reminder
- Delivered based on the Email Reminder in Days value configured on the TargetX Default Event Preferences page.
- Additionally, the Events Reminder Emails batch job must be started to deliver Reminder emails.
- For more information on the Default Event Preferences page, see Appointment Scheduler Settings.
-
Appointment Cancellation
-
Delivered when a student or advisor/staff/faculty cancels the appointment.
-
How Students Schedule Appointments with an Office
When students access the Appointment Scheduler community, they answer a short set of questions that determines which Offices and times are available.
- The student’s responses are used to return available Office time slots:
- What is the purpose of this meeting? (Appointment reason)
- How would you like to meet? (In person, virtual, phone)
- What location would you like to meet at? (Office/location)
- Who would you like to meet with?
- Office appointment availability appears when the student selects Anyone for “Who would you like to meet with.” Individual staff availability appears when a specific staff member is selected.
In the student UI for Office appointments, students:
- Select the Office from the Appointment Scheduler instead of a named staff member.
- View available appointment dates and times for that Office based on the filters above.
- Book an appointment without choosing a specific person.
- Cancel upcoming Office appointments from My Appointments and Interviews.
Managing Time Zone Preference
Students can set the time zone from the My Account page or during the appointment scheduling flow. Their selection ensures that times are displayed correctly for their desired location. A student's time zone will automatically default to match what is defined on their Contact record. Any changes the student makes in the Appointment Scheduler will override the time zone on their Contact record.
My Account Page
- Select the profile icon in the bottom left of the side panel and select My Account.
- Click the pencil icon to edit the preferred Time Zone and Phone Number.
- Select the Time Zone from the picklist that matches your preferred location.
- Set your default phone number.
- Phone Number will pre-populate if a student chooses to schedule a phone appointment, with the option to change before completing the scheduling flow
- Saving a Phone Number will not override the phone number on the Contact record
- Save changes to apply throughout the Appointment Scheduler.
Time Zone Display when Scheduling Appointments
- Students will see the time zone on each staff availability card applied to time slots.
- Selecting the abbreviated time zone will open a modal where students can select their preferred time zone from a picklist.
- Updating their time zone will automatically convert all times currently displayed and all other times throughout the Appointment Scheduler.
- The selected time zone will be saved to My Account.

How Students Cancel Appointments
Students or the institution can cancel appointments - either from the Appointment Calendar page or from when the Appointment is deleted from the CRM Calendar (either directly or via integration with Outlook or Google Calendar).
Notifications are sent to both students and advisors when an appointment is canceled can manually add/cancel an appointment, indicate if a student has attended an appointment and record notes related to the student's appointment.
When an appointment is canceled, several fields are available to collect information on the reason for the cancellation. The Cancelled Reason is a picklist of values (Appointment_Cancellation_Reason__c), and the Cancelled Note allows a user to enter text related to the cancellation.
