Implementing School Picker
The School Picker is a dynamic auto-complete feature that can be integrated into different sections, empowering users to input a few characters and receive suggested values for selection. In cases where users enter an unrecognized institution, the system will automatically update the records with the label 'Unknown School.' Additionally, the School Picker can be customized to offer a text box, allowing users to provide further details.
Adding School Picker to TX Forms
You can add the School Picker to your TX Forms and include an Unknown School text field to your TX Form.

Adding School Picker to Form Assembly Forms
Follow these steps to configure a School Picker field on a Form in Form Assembly.
Configuring a School Picker Field
- Select the "FormAssembly" application from the application picker in the top right corner.
- Click the "Manage Web Forms" tab.
- Click on the form for which you want to configure a School Picker.
- Click on the "Publish" tab.
- At the bottom of the “Publish” tab, click the Show how to prefill form data dynamically link.
- This will open a page to help you dynamically prefill your form. Scroll down to the "Parameter List" section of the page.
- In the "Field Name/Option Value" column, make a note of the number related to the School Name question on your form (you do not need the "tfa_" prefix).
Note: Your question can be in any format. For example, you may ask "What was the last school you attended?". Whatever your question, look for the number in the "Field Name/Option Value" column associated with that question.
- Once you have identified the number associated with your school question, click the "Manage Web Forms" tab.
- Click Edit next to the form name.
- Click Edit in Form Builder to open the form.
- Click the "Properties" tab.
- Click Custom Code and add the code below. Replace the ### with the number (disregarding the "tfa_") and paste the code into the “Custom Code” section of the form:
<script type="text/javascript">
$(document).ready(function() {
makeSchoolpicker("###");
});
</script>
- Click Apply, then click Save.
Note: School Picker only uses the Salesforce Site URL, NOT the TFA URL. For instructions on how to build the URL, please see: Building the URL for a Student-Facing Inquiry Form.
Configuring More Than One School Picker
- Repeat the makeSchoolpicker line once for each instance as shown in the example below:
$(document).ready(function() {
makeSchoolpicker("3");
makeSchoolpicker("7");
});
</script>
Filtering the School Picker by Account Type
- Add a second parameter to the makeSchoolpicker function with the type(s) you want that picker to display. To show multiple types, insert a semicolon between the types (NO spaces):
$(document).ready(function() {
makeSchoolpicker("3","Church");
makeSchoolpicker("7","High School;College");
});
</script>
-
Click Apply, then click Save.
If you are using EDA, you should always set the School Level to exclude Administrative Accounts:
makeSchoolpicker("7","High School;College");
- In your salesforce account, go to [Your Name] > Setup and search for Custom Settings.
- Click Manage next to "Events Settings".
- Click Edit next to "default".
- Fill in the complete API name of field you want to filter on in "School Filter Field." For example, TargetX_SRMb__School_Level__c.
Notes:
- The field used for the filter has to exist on the Account object.
- Unknown School will always default to appear in the School Picker no matter what you search for, as it is written into the code.
Adding a filter to the School Picker
You can add a WHERE clause to filter the list, display a different Label in place of Account Name or restrict the Max Records displayed by using the following steps:
Note: This update can only occur within Sandbox and then perform a change set to Production in order to save those changes. For additional information, please see Creating and Deploying a Change Set.
Add a filter
- Navigate to Setup and search for Apex Classes.
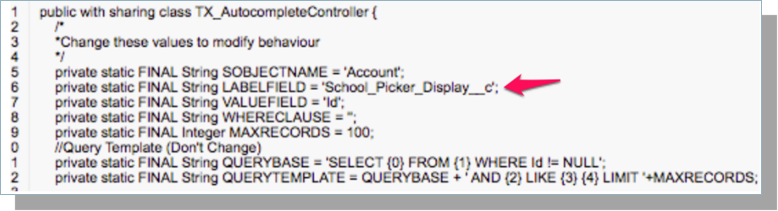
- Locate the TX_AutocompleteController and select Edit.
- Add the filter (WHERECLAUSE) on Line 8 in the following format:
private static FINAL String WHERECLAUSE = '(TargetX_SRMb__school_level__c = \'Secondary\' OR TargetX_SRMb__school_level__c = \'Higher\')';
This example filters out records where the School Level field (picklist) is either Secondary or Higher.
-
Once updated you need to migrate TX_AutocompleteController to production.
To restrict the max number of records returned
- Add the following on Line 9, changing the MAXRECORDS value to your preference:
private static FINAL Integer MAXRECORDS = 100;
- Once updated you need to migrate TX_AutocompleteController to production.
To display a different field in place of the Account Name 
You can display a formula field that is a concatenation of the Account Name, City & State
- Update the LABELFIELD on Line 6 with the api name of your custom formula field. For example (where 'Online_App_Display_Value__c' is my custom formula field):
private static FINAL String LABELFIELD = 'Online_App_Display_Value__c';
Note: Unknown School will always default to appear in the School Picker no matter what you search for, as it is written into the code.
Enabling the School Picker on the Community Registration Page
You can choose to include the School Picker on the Self Registration page so that you can assign a staff member and start communicating with applicants as soon as they sign up. By default, the Registration page will NOT include the School Picker but you can enable the School Picker using the following steps:
- Navigate to Setup and search for Visualforce Page.
- Locate TX_CommunitiesSelfReg and select Edit.
- Search for the following section:
<!--Uncomment below section to enable school picker→
<!--
     <label style="margin-top:60px">
         <c:TX_Autocomplete model="{!accountId}" label="School"></c:TX_Autocomplete>
     </label>
-->
- Remove the <!-- and --> symbols.
- It should look similar to this
<!--Uncomment below section to enable school picker-->
    <label style="margin-top:60px">
        <c:TX_Autocomplete model="{!accountId}" label="School"></c:TX_Autocomplete>
    </label>
- Set the label that will display to the user:
- Replace School with your preferred text:
- label="School"
- Replace School with your preferred text:
- Save your changes.
Note: You can add a filter to the School Picker by updating the TX_AutocompleteController.
To REQUIRE the School Picker, see: How to Require the School Picker on the Community Registration Page.
If your institution has implemented the EDA Administrative Accounts model, see the article Updating your Community Registration Site to be compatible with EDA to point the School Picker to the Primary Educational Institution field on the Contact record.

Requiring the School Picker on the Community Registration Page
You can make the School Picker a REQUIRED field on the Community Registration Page by completing the following steps:
Note: This update can only occur within Sandbox and then perform a change set to Production to save those changes.
For additional information, please see: Deploying from Sandbox with Change Sets.
- Navigate to Setup and search for Apex Classes.
- Locate TX_CommunitiesSelfRegController and select Edit.
- Search for the following section:
//Uncomment below to make school picker required
            /*
            if (String.isBlank(accountId)) {
                ApexPages.Message msg = new ApexPages.Message(ApexPages.Severity.ERROR, 'Please Select A School');
                ApexPages.addMessage(msg);
                return null;
            }
            */
- Remove the /* and */ symbols.
- It should look similar to this.
 if (String.isBlank(accountId)) {
                ApexPages.Message msg = new ApexPages.Message(ApexPages.Severity.ERROR, 'Please Select A School');
                ApexPages.addMessage(msg);
                return null;
            }
- Click Save.