
Return to TX Community

Liaison

Base Upgrade

Step 1 - Record the Current Package Version 

​Before upgrading,  find and record your currently installed version:

  1. Navigate to Setup > Installed Packages
  2. Search for TargetX_Base
  3. Record your current version number

Note: ​If your current version is 2511.0, you are on the most recent package and should proceed to the Payment Connector Upgrade

The May '25 Base package was replaced on October 14, 2025, to incorporate additional Resolved Defects. See May '25 Release Notes for details.

Step 2 - Check for Custom Object Tab 

  1. Navigate to Setup and search for Tabs.
  2. Check to see if you have a Custom Object tab for TargetX Logs.
    1. If you do NOT have the tab, proceed to the next step.
    2. If you DO have the tab, Delete the tab and then proceed to the next step.
    3. If you DO have the tab but do NOT have the option to Delete, proceed to the next step.

Step 3 - Install the Upgraded Package 

This is your "ending version" (i.e., the version you want to upgrade to). You can select any version that's higher than your current package version. Packages are cumulative, meaning the upgraded package you select includes all features from previous packages. For example, if you're upgrading from Package A to Package D, that package includes all features from Packages B and C. 

  1. Navigate to TargetX Recruitment Suite: Admin Group to select and obtain the upgraded package. 
  2. Choose "Install for Admins Only.
    • Remember to update the appropriate Profiles and Permission Sets if additional security is required.

Step 4 - Complete Additional Configurations

After installing the upgraded package (i.e., the ending version), you must complete additional configuration steps to ensure all functionality is available. Use the following chart to complete the additional configurations. Identify your starting package and your ending package, then complete all configurations steps in between. For example, if your starting version is xxxx.1 and you're upgrading to xxxx.4, you'll need to complete all configuration steps for xxxx.2, xxxx.3, and xxxx.4.

Starting Version

This is the version you currently have installed, as Identified in Step 1.

Ending Version

This is the upgrade you are installing, as selected in Step 2.  

Configuration Steps by Release

These are the steps you need to complete, from the starting version to the ending version. For example, if your starting version is 2205.0 (May '22) and you're upgrading to 2208.6 (August '22), you'll need to complete the configuration steps for 2206.3 (June '22), 2207.0 (July '22), and 2208.6 (August '22). 

2410.6 2411.14 (November '24) No configuration steps. 
2411.14 2412.0 (December '24) No configuration steps. 
2412.0 2502.1 (February '25)

Item 1: Regenerate Permission Sets

A. Permission sets for Inquiry Forms (Site-User) should be regenerated to use the new object, Configuration Version, added for Form Versioning:

Note: If you have applied customized permissions to this permission set you will want to use the manual steps below (B).

  1. Navigate to the Permission Scanner tab.
  2. Select the Product/Feature = Inquiry Forms (Site-User) and Version = the version you are upgrading to (e.g. 2502.1).
  3. Select the checkbox for Use @Future to generate Permission Set if you want to have the process run in the background.
  4. Click the Generate Permission Set button.
  5. The updated permission sets will retain the currently assigned users. If needed, you can assign the Permission Sets to additional site users.

B. To manually implement these changes to customized permission sets:

  1. Navigate to Setup and search for Sites.
  2. Click your Inquiry site.
  3. Click the Public Access Settings button.
  4. Click the Assigned Users button.
  5. Select the Site User for this site.
  6. Under Permission Sets, select the Permission Set granting access to the Site User (e.g,  Inquiry Forms Site User).
  7. Click Object Settings.
  8. Select the Configuration Version object and click Edit.
  9. Assign READ access to the Configuration Version object and ALL fields.
  10. Save your changes. 

C. For Student-facing profiles (where the user authenticates into a Community), you will need to manually add Read access to the Configuration Version object:

  1. Navigate to Setup and search for Profiles.
  2. Click the Profile of your student-facing user (typically this is the Customer Community User (TargetX)).
  3. Click Object Settings.
  4. Select the Configuration Version object and click Edit.
  5. Assign READ access to the Configuration Version object and ALL fields.
  6. Save your changes. 

Item 2: Update permissions for Inquiry forms (Admin)

For anyone who needs to use the new object, Configuration Version, added for Form Versioning:

Note: If you have applied customized permissions to this permission set you will want to use the manual steps below (Option 2)

Option 1: Regenerate the Inquiry Forms (Admin) permission set 

  1. Navigate to the Permission Scanner tab.
  2. Select the Product/Feature = Inquiry forms (Admin) and Version = the version you are upgrading to (e.g. 2505.x).
  3. Select the checkbox for Use @Future to generate Permission Set if you want to have the process run in the background.
  4. Click the Generate Permission Set button.
  5. The updated permission sets will retain the currently assigned users. If needed, you can assign the Permission Sets to additional users.

Option 2: Manually implement these changes to customized Profiles or Permission Sets

  1. Navigate to Setup and search for Profiles.
  2. Click the Profile of the users that need to view responses.
  3. Click Object Settings.
  4. Select the Configuration Version object and click Edit.
  5. Assign Read and Create access to the Configuration Version object and Read and Edit access to all fields.
  6. Save your changes. 

Item 2: Upgrade Complete

  1. No further configuration is required. 

2502.1

2505.61 (May '25)

Item 1: Update permissions for Inquiry forms (Admin)

For anyone profile that needs to view responses, add the new object and fields for the Form Response object:

Note: If you have applied customized permissions to this permission set you will want to use the manual steps below (Option 2)

Option 1: Regenerate the Inquiry Forms (Admin) permission set 

  1. Navigate to the Permission Scanner tab.
  2. Select the Product/Feature = Inquiry forms (Admin) and Version = the version you are upgrading to (e.g. 2505.x).
  3. Select the checkbox for Use @Future to generate Permission Set if you want to have the process run in the background.
  4. Click the Generate Permission Set button.
  5. The updated permission sets will retain the currently assigned users. If needed, you can assign the Permission Sets to additional users.

Option 2: Manually implement these changes to customized Profiles or Permission Sets

  1. Navigate to Setup and search for Profiles.
  2. Click the Profile of the users that need to view responses.
  3. Click Object Settings.
  4. Select the Form Response object and click Edit.
  5. Assign Read and Create access to the Form Response object and Read and Edit access to all fields.
  6. Save your changes. 
  7. Repeat for any other profiles or permission sets that need to view response data.

Item 2: Update Permissions for Inquiry Forms (Site User)

For site users that will be completing Inquiry forms, add the new object and fields for the Form Response object for site users who will be completing inquiry forms.

Option 1: Regenerate the Inquiry Forms (Site User) permission set 

  1. Navigate to the Permission Scanner tab.
  2. Select the Product/Feature = Inquiry forms (Site User) and Version = the version you are upgrading to (e.g. 2505.x).
  3. Select the checkbox for Use @Future to generate Permission Set if you want to have the process run in the background.
  4. Click the Generate Permission Set button.
  5. The updated permission sets will retain the currently assigned users. If needed, you can assign the Permission Sets to additional users.

Option 2: Manually implement these changes to customized Profiles or Permission Sets

  1. Navigate to Setup and search for Sites.
  2. Click your site, such as Events or Inquiry.
  3. Click the Public Access Settings button.
  4. Click Object Settings.
  5. Select the Form Response object and click Edit.
  6. Assign Read and Create access to the Form Response object and Read and Edit access to all fields.
  7. Save your changes. 

Item 3: Update Permissions for Event Registration (Student-facing)

For Student-facing Event Registration profiles, add the new object and fields for the Form Response object. 

Note: If you have applied customized permissions to this permission set you will want to use the manual steps below (Option 2).

Option 1: Regenerate the Event registration (student-facing) permission set

Permission sets for Event registration (student-facing) should be regenerated to use the new object, Form Response, added for Saved Responses:

  1. Navigate to the Permission Scanner tab.
  2. Select the Product/Feature = Event registration (student-facing) and Version = the version you are upgrading to (e.g. 2505.x).
  3. Select the checkbox for Use @Future to generate Permission Set if you want to have the process run in the background.
  4. Click the Generate Permission Set button.
  5. The updated permission sets will retain the currently assigned users. If needed, you can assign the Permission Sets to additional users.

Option 2: Manually implement these changes to customized Profiles or Permission Sets

  1. Navigate to Setup and search for Profiles.
  2. Click the Profile of your student-facing user (typically this is the Customer Community User (TargetX)).
  3. Click Object Settings.
  4. Select the Form Response object and click Edit.
  5. Assign Read and Create access to the Form Response object and Read and Edit access to all fields.
  6. Save your changes. 
     

Item 4: Update Events (Site User) permissions

For site users that will be completing Event forms, add the new object and fields for the Form Response object.

  1. Navigate to Setup and search for Sites.
  2. Click your site, such as Events or Inquiry.
  3. Click the Public Access Settings button.
  4. Click Object Settings.
  5. Select the Form Response object and click Edit.
  6. Assign Read and Create access to the Form Response object and Read and Edit access to all fields.
  7. Save your changes. 

Item 5: Update Page Layouts

Add the new SavedResponseView visualforce page to the Contact page layout so users can easily view a Contacts Saved Responses. Choose to update the Classic Page Layout or Lightning Page Layout:

Option 1: Update the Classic Page Layout

  1. Navigate to Setup and select the Object Manager.
  2. Click the Contact/Student object and select Page Layouts.
  3. Select Edit next to the Layout you want to update.
  4. Select Visualforce Pages and drag the SavedResponseView page onto the Page Layout.
  5. Click the Properties icon (wrench) to set the Page Properties.
  6. Adjust the Height to 200 and check the box to Show Scrollbars.
  7. Save your changes.

Option 2: Update the Lightning Page Layout

  1. Navigate to the Contact tab.
  2. Click the Setup icon [gear] and select Edit Page.
  3. In the left pane, choose Components, then drag the Visualforce component onto the page.
  4. In the right pane, enter a label, such as Saved Responses.
  5. Choose the Visualforce Page Name of  SavedResponseView.
  6. Set the height to 200.
  7. Save your changes.

Item 6: Refresh Group Assignment Triggers

  1. Refresh your Group Assignment triggers to ensure the triggers are using the updated API version:

Note: Please make sure there are no ongoing updates to the rule criteria. Once you refresh, any updates in progress will be published and go live.

  1. Navigate to the TargetX Builder tab.
  2. Click Group Assignment.
  3. Click the gear icon [  ], then select Publish Settings.
  4. Click the arrow next to the Migrate button for each trigger you wish to refresh.
  5. Click the Refresh button at the bottom of the window.
  6. When Refresh completes, a message on the Group Assignment home page will say "Trigger was deployed successfully" if successful or a relevant error message if there was a problem during the refresh process.

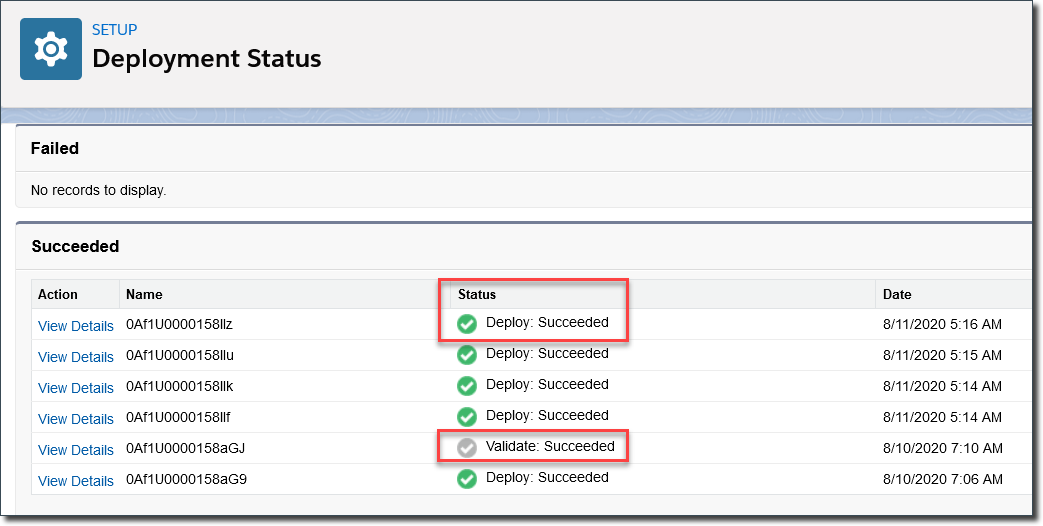
To view the Status navigate to Setup and search for Deployment Status; you will see the deployment record with the corresponding mode Validate/Deploy and a status. If you need further assistance in interpreting these errors, contact your Project Manager or the TargetX Support Team:

Deployment Status screen

Encountering an error when attempting to refresh your trigger? Review the Common errors in Group Assignment migration or refresh article.

Item 7: Upgrade Complete

  1. No further configuration is required. 

2505.61

2511.0 (November '25)

 Item 1: Update Permissions for Inquiry Forms (Site User)

For site users that will be completing Inquiry forms, add the new object and fields for the Form Response object for site users who will be completing inquiry forms.

Option 1: Regenerate the Inquiry Forms (Site User) permission set 

  1. Navigate to the Permission Scanner tab.
  2. Select the Product/Feature = Inquiry forms (Site User) and Version = the version you are upgrading to (e.g. 2505.x).
  3. Select the checkbox for Use @Future to generate Permission Set if you want to have the process run in the background.
  4. Click the Generate Permission Set button.
  5. The updated permission sets will retain the currently assigned users. If needed, you can assign the Permission Sets to additional users.

Option 2: Manually implement these changes to customized Profiles or Permission Sets

  1. Navigate to Setup and search for Sites.
  2. Click your site, such as Events or Inquiry.
  3. Click the Public Access Settings button.
  4. Click Assigned Users.
  5. Click the Site User Full Name.
  6. Under the Permission Set Assignments, select the permission set you wish to update. E.g., TX Inquiry Forms (Site User)
  7. Click Object Settings.
  8. Select the Form Response object and click Edit.
  9. Assign Read and Create access to the Form Response Object.
  10. Assign Read and Edit access to the Related Id field.
  11. Save your changes. 

Item 2: Upgrade Complete

  1. No further configuration is required. You may proceed to the Payment Connector Upgrade


  • Was this article helpful?