Working with Your Preconfigured Features
Your instance of Outcomes comes with several features preconfigured to make it easier for you to get started. In this article, you'll find a summary of what has been set up for you, and how you can best take advantage of this template.
Dashboard
The Dashboard is designed to present you with a quick view of the information most relevant to you.

Your preconfigured Dashboard includes the following elements:
- Edit pencil: if you need to modify the items included on your Dashboard, use the Edit pencil to customize your view. You can also edit Dashboards by editing the Report that is configured as your Dashboard. If you edit your Dashboard and an administrator makes changes to the report that serves as your Dashboard, you may need to click the edit pencil, then click Revert to apply the changes.
- Goals chart: in Outcomes, Goals are targets you set for the number of applications that match some criteria. The preconfigured chart includes a goal of 500 CAS applications. You can edit this Goal from the Reporting view in the software.
- Application Status chart: this Dashboard chart allows you to see the number of applications in each CAS Application Status at a glance.
- Your Review Assignments chart: this Dashboard chart shows you where you stand with the reviews assigned to you. Click Continue Reviewing to navigate to your next review assignment.
- Review Assignment Progress chart: this Dashboard chart shows you the progress of your Review Team in completing assigned reviews.
- Phase Pipeline chart: in Outcomes, Phases are categorizations you place applications into as they progress through your application cycle. This Dashboard chart shows you how many applications are in each of your Phases.
- Decision chart: this Dashboard chart shows you how many applications you've placed in each Decision.
Reports
Reports in Outcomes are sets of charts that allow you to visualize application information quickly. You can also assign a Report to be used as a Dashboard for different groups of users. To navigate to your Reports, click Reporting on the Navigation Menu.There are several reports that are preconfigured for you:
- Admissions Dashboard: this report is designed for use as a Dashboard for your admissions team members. It contains relevant information, including a Goals chart for submitted CAS applications, a Review Assignments chart, an Application Status chart, an Applications by Phase chart, and a Team Review Progress chart.
- Dean Admissions Funnel Dashboard: this report is designed for use as a Dashboard for users who need to see information regarding your enrollment funnel, including submit rate, completion rate, offer rate, and yield rate.
- Default Dashboard: as described above, this report is designed for use as a default Dashboard, containing information that is relevant to a wide range of people on your team.
- Director Dashboard: this report is designed for use as a Dashboard for program directors, or anyone needing a quick view of your applicant's CAS application statuses, and your programs' application pipeline.
- Marketing Dashboard: this report is designed for use as a Dashboard for individuals who only need to see where you stand with specific Goals.
- Reviewer Dashboard: this report is designed for use as a Dashboard for reviewers who need to see where they stand with their assigned reviews and team reviews. It also includes an Applications by Review Phase chart, showing you how many applications are in each of your Phases.
Applications View
The Applications View allows you to search, sort, review, and quickly gain information on the applications visible to you. It includes a Phase Pipeline and an Applications Grid that are configured to give you the most relevant information. To access the Applications View, click Applications on the Navigation Menu.

- Program and Segments Selector: use this dropdown to select which group of applications you want to view, either by program or Segment. By default, all applications visible to you are displayed.
- Search, View, and Filter options: click the Search icon to find applications. Use the List View/Map View toggle to switch between the list (default) view of applications, and the map view, which shows you a visualization of where your applicants are located. Use the filters to query your application pool and isolate the subset of your choice. You can also use this menu use to create a new Segment of your application pool.
- Phase Pipeline: this area gives you a quick snapshot of your applicant pool, allowing you to see how many applications you have in each Phase you've established. Click on any Phase to isolate the applications within it.
- Application List: this area lists all applications or those that meet the filters you've established.
- Click on any column header to sort by that column.
- Click on any application record to see all its details or conduct a review.
- Click on the checkboxes to select applications to complete one of the available actions.
- Grid Customizer: this menu allows you to customize the columns that appear in the list view, or to reset back to the default view.
Application Summary
In Outcomes, you can customize the Application Summary View so that it displays the application information that you'd most like to see at a glance when opening an application. To edit what appears in your Application Summary or Sidebar, open the Application Review section of the Settings menu and click Application Summary View.

To edit the data points that appear in the Summary or the Sidebar, click the edit pencil, then drag items from the Available Fields area into where you want them to appear. Click and drag to reorder each field. Click the plus signs at the bottom of the page to add new groups to place fields into.
Roles
In Outcomes, you can create Roles that correspond with different types of users at your institution. Each Role is customized with its own set of permissions and access. For example, you can create Roles for Reviewers, Interviewers, IT Team members, etc., and each Role allows its users to complete their required tasks. To access your Roles, open the Organization section of the Settings menu and click Roles.
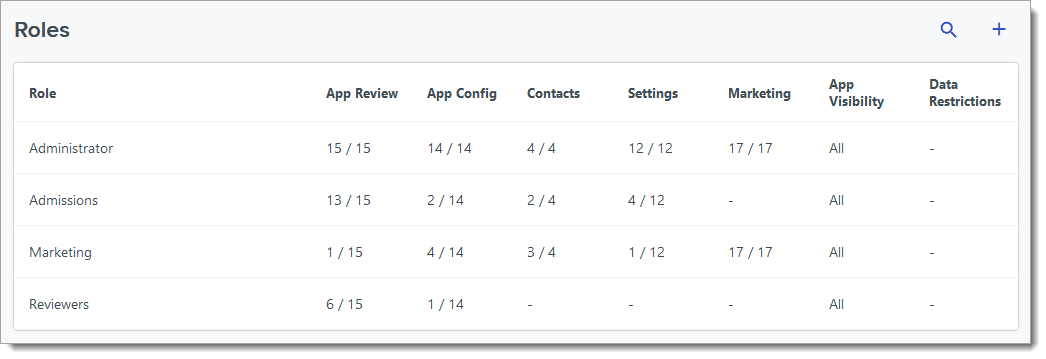
The Roles that are preconfigured include the Administrator role (default) role, and the following:
Each Role is configured with its own set of permissions. You can edit the Roles as desired to suit your needs. To return to your original Role settings, consult the links above to review screenshots of these settings.
Evaluation (Review) Forms
In Outcomes, the standard way of assigning applications involves three steps:
- Creating Evaluation Forms to provide a place for reviewers to enter their results.
- Configuring Phases to establish which reviewers will be assigned and which Evaluation Forms they will use.
- Changing applications' Phases to assign them.
Once that is done, Reviewers can complete their reviews.
Assigning applications using this process has several benefits, including the ability for assignees to enter their responses in the Evaluation tab, the ability to create PDF files with evaluation results, and the ability for assignees to be notified of their assignments. For a simpler process, though, you may wish to assign applications using Tags or Tasks instead.
Your Outcomes template comes with a prebuilt Evaluation Form that you can modify to suit your needs. To access the Evaluation Forms, navigate to the Application Review section of the Settings menu, and click Evaluation Forms.
Click the Edit pencil next to any question on the Evaluation Form to modify or delete it. Click Add Question to add new questions in each section. Click Add Section at the bottom of the page to add a new section with different questions.

Review the Working with Your Preconfigured Evaluation Forms page to see the settings of each Evaluation Form section prebuilt in your template.
Review Teams
You can establish teams of users who will evaluate applications in the software. By creating teams, you can assign applications to an entire team at once. Your template comes with three prebuilt teams.

Click on any of the Teams to review and edit their settings. This allows you to rename the teams, categorize them, and add members.
Phases
Phases are different periods during the application cycle that you establish. You can create Phases to organize applicants, corresponding with their current status with your institution. While configuring Phases, you can also associate Evaluation Forms that need to be completed for each application in that Phase, and who will complete these forms. To access your Phases, open the Application Review section of the Settings menu and click Phases.

Click the Edit pencil at the top right to configure your Phases or add new ones.The preconfigured Phases include:
- Not Reviewed: applications start in this Phase by default, and should be moved to other Phases as they progress through the application cycle.
- Prescreen: this Phase is designed to be a bucket to move applications in before you've started to review them. You may decide to associate this Phase with a prescreener, who will review the application for completeness.
- Missing Materials: this Phase is designed to be used when prescreened applications are missing required items (e.g., test scores, references, etc.) You may decide to contact these applicants periodically to remind them of what they are missing.
- Review: this Phase is designed to be used during your review process. You can associate the appropriate Evaluation Form with this Phase, and assign reviewers or Review Teams to work on applications in this Phase.
- Recommended Decision: this Phase is designed to be used after your reviewers have completed their evaluation, before you've made a final decision.
- Final Decision: this Phase is designed to be used once a final decision is placed on applications. You may also decide to create a separate Phase for each Decision.
Custom Properties
Custom Properties are fields you can create to capture additional information about applications or contacts.

The Custom Properties that were preconfigured for you include:
- SIS ID: a string field, use this to store your internal application ID
- Funding Awarded: a dropdown field, use this to indicate the type of funding or grant an applicant was awarded.
- Checklist - Recommendations: a dropdown field, use this to indicate the status of required material.
- Checklist - Transcripts: a dropdown field, use this to indicate the status of required transcripts.
- Checklist - Tests: a dropdown field, use this to indicate the status of required test scores.
- All Transcripts Received - Official or Unofficial: a boolean field created with JavaScript code, use this to determine if the application has at least one transcript for every listed college.
Review the Working with Your Preconfigured Custom Properties page to see the settings for each Custom Property prebuilt for you.
Decisions
Decisions are labels you place on each application to indicate the applicable admissions decision you've made. By default, two decisions are available in your template.

Application Segments
Segments are groups of applications or contacts that meet a specific set of criteria you’ve established through filters. Using Segments, you can work with different subsets of applications or contacts without creating a new filter each time. To view your Segments, click the dropdown at the top of the Applications Grid. From this view, the Segments are grouped into different categories, including Programs, Default Exports, Goals, Requirements, and Review Teams. Click on a category to see the Segments within it.

You can also access Segments by opening the Application Review section of the Settings menu and clicking Application Segments. You can also add new Segments from that page or after creating a filter on the Applications Grid.

The Preconfigured Segments page shows the settings of Segments that exist in your software. This may include:
- Accepted Applications: this includes all applications that have the Accept Decision Code applied to them.
- All Transcripts Not Received: this includes all applications with missing transcripts (i.e., their All Transcripts Received property is set to false).
- CAS Applications - Submitted, Incomplete: this includes all applications whose CAS Application Status is currently Received.
- Has a Decision Letter: this includes all applications with a Decision Letter produced.
- Submitted CAS Applications: this includes all applications whose CAS Application Status is NOT In Progress.
- Yield Rate Segment: this includes all applications whose CAS Application Status is Complete and who have a Deny or Accept Decision Code placed on them.
Exports
You can create exports to extract data out of Outcomes. In your template, there are several preconfigured Exports. To access your exports, go to the Import/Export section of the Settings menu and click Exports. From here, you can add new exports or click any existing export to edit its configuration.

You can generate an export on demand or as part of an Export Schedule. Exports prebuilt for you include:
- Default Accepted Applications Export: this export is designed to give you key information for each application, including the applicants' names and contact information, program they are applying to, Phase, and the Decision you've applied to them.
- Default Application Export: similar to the Default Accepted Applications Export, this export contains key information for each application. Along with the applicants' names and contact information, it also includes biographic and residency information, ethnicity, and test information.
Contact Types
In Outcomes, you'll use Contacts to keep track of your interaction with recruits, applicants, students, and others. When adding Contacts, you'll select a Contact Type, which designates which group each Contact is included with. For example, you can have one Contact Type for applicants, another for institutions that you communicate with, and another for advisors. To access your Contact Types, open the Contacts section of the Settings menu and click Contact Types.

The following Contact Types are included in your template:
- Applicant: use this Contact Type for potential, in progress, or future applicants. Submitted applicants found in the Applications view automatically get a corresponding contact record with this Contact Type. By default, the Applicant Contact Type has fields for each applicant's name, contact information, and biographic information.
- College: use this Contact Type for colleges you'll need to keep in touch with. This helps track the schools your applicants have attended, as you can relate the colleges to your applicant contacts. You can also search the colleges using the data points stored in their contact records.
- Parent/Guardian: use this Contact Type with parents or guardians of applicants that you may need to communicate with. By default, the Parent/Guardian Contact Type includes fields for name, contact information, first language, and education history.
To add new Contact Types, click the plus sign at the top right. You can edit any existing Contact Type (rename, add new fields, reorder existing fields, etc.) by clicking the Contact Type and making the needed changes.
