Managing Roles
At your institution, you may have people who are responsible for completing different tasks in Outcomes. To accommodate this, you can create Roles that correspond with different types of users. Each Role is customized with its own set of permissions and access. For instance, you can create Roles for Reviewers, Interviewers, IT Team members, etc. When creating or editing users, you can assign the appropriate Role to them.
Here's an example of how this works: If you want your reviewers to edit the Tags on your applications, you'll need to: 1) create a Role for your reviewers, 2) assign the Edit Application Tags permission to this Role (along with any other needed permissions), and 3) place all your reviewers in this Role.
Note: In addition to Roles, you can also control application visibility through the Reviews and Teams features.
By default, you'll have an Administrator Role that grants full access to all features. Where appropriate, you can assign this Role to users instead of using a customized Role.
Creating a New Role
To create a new Role:
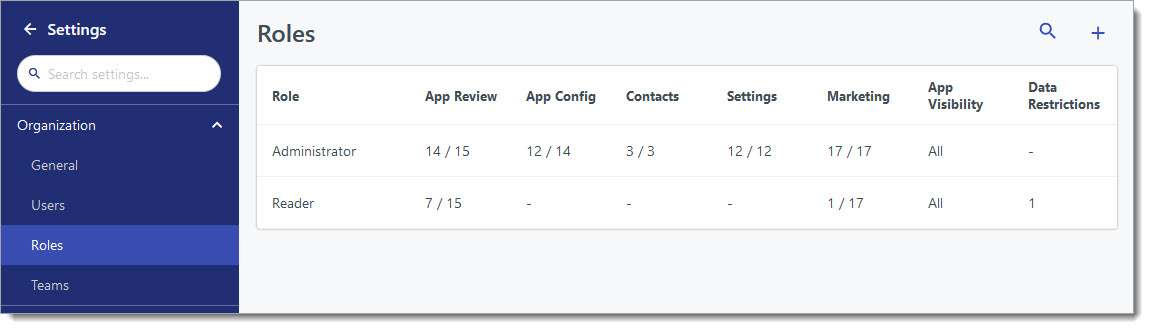
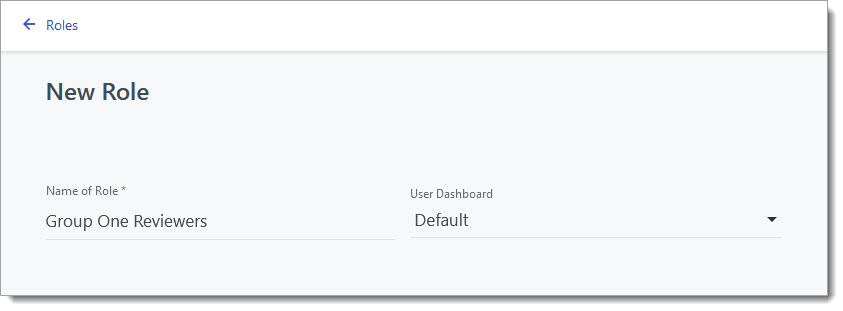
- Go to the Roles option in the Settings Menu. The Roles page shows your existing roles and indicates how many of the available permissions are enabled in each category for each Role. To begin building a new Role, click the plus sign at the top right.
- Give the new Role a name and select from the available dashboards. The dashboards that appear here are the Reports you've created. The Report you select here becomes the Dashboard for any user in this Role, and they can modify it as desired.
- Use the checkboxes to enable the actions you'd like to permit for the users in this role. Where applicable, tick the checkbox near the heading of a group of actions. This allows you to select individual actions within that group. Any items left unchecked may still be visible to the reviewers. To hide items, use the Data Restrictions area.

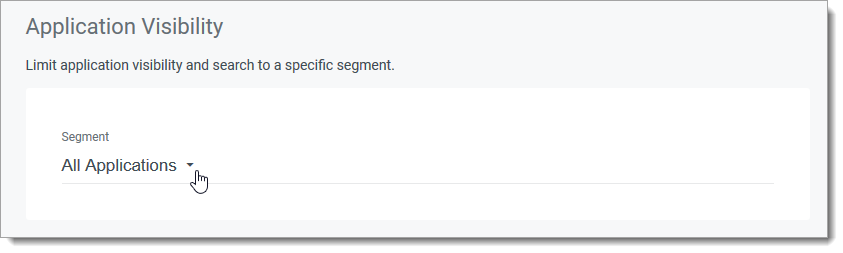
- To limit which applications are visible to users with this Role, make a selection under Segment in the Application Visibility area. If you make a selection here, users in this Role can see all the applications in the Segment you choose. Keep in mind, users can also see applications that have been assigned to them, regardless of the Role they are in.
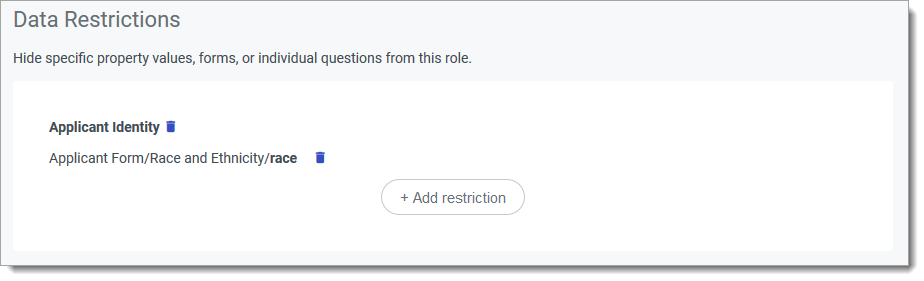
- To add data restrictions, click Add Restriction. Select the type of restriction you’re adding. By default, all items listed are enabled for viewing. Use the sliders to restrict the desired information. Click Add to add the restrictions.
- Click Create Role.
The Roles page lists your existing roles, and displays a grid that allows you to review which Actions are enabled for each Role. Roles are listed at the top of the grid. To edit any of your existing roles, click on the desired Role here.
Remember that users, including administrators, cannot change their own Role. For this reason, we recommend creating a "Super User" Role. With this, you can edit the Administrator Role and any other Role that needs changes. To do this, create a new Role called Super User and grant it all of the same permissions that the Administrator Role has. Assign this Role to at least one person. Then, if you need to update the Administrator Role, the person in the Super User Role can make the needed changes.
Permitted Actions
When creating Roles in Outcomes, you can select which actions are available to the users with each Role. See below for a description of the available actions. Note that you may only have access to certain permissions based on your Outcomes configuration.
Application Review
|
Role Actions |
Definition |
|---|---|
| Impersonate Applicants | Allows users to temporarily access individual applicant portals on behalf of the applicant. |
| Review Applications | Allows users to fill and submit review forms for any application. |
| Assign Applications | Allows users to assign applications to other users. |
| Send Email to Applications | Allows users to send emails to applicants via the Applications grid bulk actions, or from the Application Review page. |
| Edit Application Data | Allows users to change values for data submitted by the applicant in their program’s forms. |
| Edit Application Properties | Allows users to change values for internal application metadata - not submitted through an application form. |
| Change Application Phase | Allows users to move applications through the established set of Review Phases, to trigger review assignments and workflows. |
| Edit Application Tags | Allows users to add or remove any Tags on an individual application record. |
| Change Application Stage | Allows users to move applications through the set of Applicant Stages defined on their Programs which will alter the content required through the Applicant Portal. |
| View Reviews | Allows users to read individual submitted Review Forms from other users and see summary review forms calculations. |
| View Concealed Fields | Allows users to see fields marked as “Hidden”, either in Application Form or Application Properties. |
| Comment on Applications | Allows users to place new comments on an application record. |
| Copy Applications | Allows users to copy an application to another program or create a new one. |
| Change Application Decision | Allows users to set the Decision value for an application record from the established set of Decision codes. |
| Manage Program Properties | Allows users to work with the Program Properties section of the Settings Menu. |
Application Management
|
Role Actions |
Definition |
|---|---|
| Manage Programs | Allows users to edit the list of Programs and configure all available Program metadata, such as Stages, Open Dates, Forms, and Checklists. |
| Manage Application View Layout & Properties | Allows users to configure the universal Application Summary View and side panel contents that appear on every application record. |
| Manage Application Segments | Allows users to add, remove, or edit Application Segments, their Categories, and contained filters. |
| Manage Application Forms | Allows users to add, remove, or edit the set of Forms, and their content, which are available for use with any Program. |
| Manage Review Forms | Allows users to add, remove, or edit the set of available Review Forms, their names, and their questions. |
| Manage Review Phases | Allows users to add, remove, move, or edit the set of Phase Groups and Review Phases, their associated Review Forms, Assignment logic, and Summary Calculations. |
| Manage Reference Forms | Allows users to add, remove, or edit the set and contents of available Reference Forms for use in the Applicant Portal. |
| Manage Automation Rules | Allows users to add, remove, or edit any Automation Rules and available metadata, like names, triggers, filters, and actions. |
| Manage Decision Settings | Allows users to edit the set of Decision values and metadata for the account. |
| Generate Decision Letter | Allows users to produce a Decision Letter for applicants. |
| Manage Decision Letter Template | Allows users to configure Decision Letter templates. |
Contacts
|
Role Actions |
Definition |
|---|---|
| Edit Contacts | Allows users to add or remove any Contact, and edit any data on Contact records. Edit all Contact settings, such as Contact Types, Contact Properties, and Integrations. |
| Manage Contact Data Sources | Allows users to add new data sources for importing and updating contacts. |
| Manage Contact Routing Tables | Allows users to create and edit contact routing tables, for use in managing assignments. |
| Manage Contact Segments | Allows users to add, remove, or edit Contact Segments, their Categories, and contained filters. |
| Manage Contact Summary Views | Allows users to configure the summary view for contact records. |
| Manage Contact Workflows | Allows users to configure workflows for contacts. |
| Manage Duplicate Contacts | Coming soon! |
| Resend Activation Emails | Allows users to resend activation emails from the Pending Accounts page. |
| Inquiry Forms | Allows users to add, remove or edit contents of Inquiry Forms and configure contents of the Inquiry Portal. |
| Manage Contact Type | Allows users to add, remove, or edit Contact Types. |
| Manage Contact Calculated Fields | Allows users to add, remove, or edit Calculated Fields in the Contacts area. |
| Manage Assigned Conversations | Allows users to send messages and work with the management functions (reassign, resolve, etc.) for the conversations assigned to them. |
| View All Conversations | Allows users to see all conversations. |
| Manage All Conversations | Allows users to see and manage all conversations. |
| Use Contact Email Templates | Allows users to work with email templates when sending contact emails. |
| Send Contact Email | Allows users to send emails to contacts. |
| Activate Pending Contacts | Allows users to activate contacts from the Pending Contacts page. |
General Settings
|
Role Actions |
Definition |
|---|---|
| Allows users to configure Global Data Restrictions. | |
| Manage Users | Allows users to add, remove, or edit any user and their metadata, such as Role, Team, and Portal Access. |
| Invite Users | Allows users to send portal invitation emails to users for initiation of system access. |
| Manage Roles | Allows users to create and edit any Roles in the software. |
| Manage Workspaces | Allows users to create and edit Workspaces. Granting this permission also excludes users from being restricted by a Workspace's settings. |
| Manage Teams | Allows users to add or remove any Team and configure the User membership of any Team. |
| Impersonate Organization Users | Allows users to temporarily access the Outcomes Portal on behalf of a specific user to troubleshoot or configure their account. |
| Manage Organization Settings | Allows users to edit these core settings, including Organization Name and time zone. |
| Manage Email Settings | Allows users to configure how notification emails are sent/signed to system or portal users. |
| Manage Reports | Allows users to add, remove, or edit any report, its content, and sharing link settings. |
| Manage Goals | Allows users to add, remove, or edit any Goal and its available metadata, such as Target, Segment, and Dates. |
| Manage Key Vault | Allows users to work with the Key Vault section of the Settings menu. |
| Manage Exports | Allows users to add, remove, or edit the set of Exports, their names, contents, filters, schedule, and delivery settings. |
| Generate Exports | Allows users to export files. This applies to On-demand Exports from the Applications grid and Scheduled Exports including any applications or data they are permitted to view. |
| Manage Inquiry Portal | Allows users to configure the URL and styling of the Inquiry Portal. |
| Manage Reference Portal | Allows users to configure the URL and styling of the Reference Portal. |
| Manage Student Portal | Allows users to configure the URL and styling of the Student Portal. |
| Manage Content Templates | Allows users to configure Content Templates in the Application section of the Settings Menu. |
| Personalize Dashboard | Allows users to customize the default Dashboard’s contents, filters and layout to match one’s own personal preferences. |
| View All Settings Pages | Allows users to review all settings in the Settings Menu, including settings related to features they don't have permission to edit. |
Marketing
|
Role Actions |
Definition |
|---|---|
| Manage Marketing Settings | Allows users to work with the Marketing Settings. |
| View Outreach | Allows users to view the sent list and contents of emails, text, and voice messages in campaign tracks. |
| Manage Outreach Campaigns & Tracks | Allows users to turn off messages and to create, edit, and delete tracks. |
| Manage Emails | Allows users to create, edit, and delete emails on the campaign tracks pages. |
| Send Emails | Allows users to activate and deactivate emails to be sent. Set the schedules for email tiers. |
| Manage Text Messages | Allows users to create, edit, and delete text messages on the campaign tracks pages. |
| Send Text Messages | Allows users to activate, and deactivate text messages to be sent. Set the schedules for email tiers. |
| Manage Voice Messages | Allows users to create, edit, and delete voice messages on the campaign tracks pages. |
| Send Voice Messages | Allows users to activate and deactivate voice messages to be sent. Set the schedules for email tiers. |
| View Marketing Email Templates | Allows users to view the active and archived email templates on the Email Templates list page in the Marketing section. |
| Manage Marketing Email Templates | Allows users to create, edit, and archive email templates in the Marketing section. Note that changing templates doesn't impact existing emails. |
Events
|
Role Actions |
Definition |
|---|---|
| View Events | Allows users to work with the Events feature and its related pages. |
| Manage Events | Allows users to edit and create Events. |
| Manage Event Emails | Allows users to send emails to event registrants from within the Events feature. |
| Manage Event Registrations | Allows users to manage registrants for an event. This includes adding, updating, or removing their registrations. |
| Manage Event Types | Allows users to create or rename Event Types. |
Payment Journal
|
Role Actions |
Definition |
|---|---|
| Manage Payment Processors | Allows users to configure payment processors in the Payments section of the Settings Menu. |
| Waive Payment | Allows users to waive an applicant's required payment where applicable. |
| View Payment Details | Allows users to review application fee payment details. |
Sample Roles
Review the examples below for ideas to consider when creating roles for your environment.
Example 1: Reviewers Without Access to Ethnicity Data
Purpose
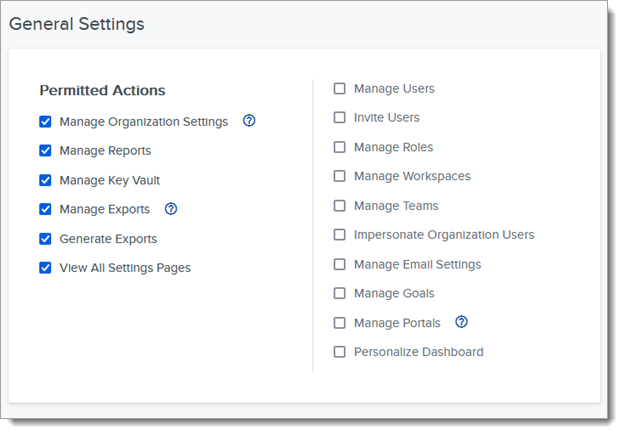
In this example, the program has created a Role for users who will be reviewing applicants. As seen below, the reviewers don’t need any administrative functionality, but they need to review all applications. They need access to submit review forms (via the Review Applications action) and update tags (via the Edit Application Tags action). The program has decided to allow reviewers to generate exports that have been created for them. To complete these tasks, the reviewers won't need access to Contacts or Marketing, and the program has decided to obscure the ethnicity and race information (via the race data restriction).
Application Review

General Settings

Application Visibility and Data Restrictions

Note: if you receive the Full Application PDF from CAS, you'll also need to add Application PDF as a data restriction, as race and ethnicity information is available there.
Example 2: IT Staff
Purpose
In this example, the program has created a Role for technical teams who will be working with applicant segments and configuring exports. They only need access to the data that will be exported.
General Settings
Application Management

Adding Users to Roles
Once you create Roles, you can assign them to existing users. Each user can only be in one Role.
- Using the Navigation Menu, click Settings.
- Under the Organization section, click Users.
- Click the applicable user's name.
- Select the applicable Role.
- Click Save Changes.
Managing Roles
To manage existing Roles:
- Using the Navigation Menu, click Settings.
- Under the Organization section, click Roles.
- Click the search icon to search for Roles.
Each Role is listed, indicating how many of the available Role actions are enabled in each category.
Editing Roles
To edit an existing template, click the Role name, make any desired edits, then click Save Changes.
Deleting Roles
To delete a Role, click the Role name, then click Delete Role. Note that you cannot delete a Role that is currently assigned to a user.