Creating Application Forms
Creating an Application Form
- Select the Application Forms Tab.
- Select New.
- Specify the Application Type.
- Select the appropriate Payment Connector.
- Enter the Amount that must be paid to submit the application. If no fee is charged, leave this field blank.
- Indicate whether this application should be Reusable.
- Indicate whether this application will be used for users to submit Recommendations.
- Indicate whether Allow waiver should be enabled.
- If you will be using Enrollment Deposits, specify the Enrollment Deposit Payment Connector and Enrollment Deposit Amount.
- If you want to allow Applicants to submit their application and then return later to submit a payment, select Enable Payment After Submit.
- Save the new Application Form.
- Select your newly created application form. Upon access to the form, the Form Builder and App Configuration buttons will now display, and you can begin configuring the fields and sections of your application.
Notes:
- You MUST include the App/Contact card with AT LEAST 2 fields.
- If you decide to CLONE an Application Form, only the CURRENT version of the Application Form will be cloned.
Adding Fields
- Select the Application Form tab and select the Application Form where you want to add fields.
- Select the Form Builder button. If you don't see the Form Builder button, please see How do I add the Form Builder button to my Application Form page layout?
- Add a New Section to the application by selecting the +
-
Specify the Section Label.
Note: the Section Label also functions as a link when the student completes the application.
-
- Initially, new Fields will go to the bottom of the Section. You can drag the field higher after it's been added.
- Determine the object you want to collect information about. For example, the contact object, the essay object, or the test object.
- Drag the appropriate object cards into the Section you created.
- Select the > next to the card to select individual fields from that object. For example, if you select the contact object, you can add fields about the date of birth or address information.
- Select the Setup icon to update the Field Label for the Section.
- Scroll the list of available fields on the left or search for a specific field name and drag it into the Section.
- For each field, you can configure numerous settings:
- Field Label
- Hidden
- Type
- Required
- Visibility Condition
- To customize the field, click the Setup icon.
- To return to the section setup page from the field screen, click the large '<' symbol in the upper left corner. Be sure to Save your changes first.
- To return to the Form Builder screen, select the 'less-than' symbol in the upper left corner.
- Select the New Section + in the Form Builder window to add another page to the application.
- To remove a page, select the drop-down list to the right of the Section Name and choose Remove.
- Save and Preview your application.
- Publish your application.
Note: it is recommended that validation rules be configured to display an error message at the field level. If it is set to the top of the page, the student will not see the specific error message and will not know what issue to resolve with their data. Validation errors (e.g., email format invalid) will appear after the student saves the form and SalesForce displays the error.
Once fields are added to the Application Form, you can configure fields to cater to the applicants who will be using them. For example, adding text fields, a link, or adding autocomplete fields, among others.
Adding Hidden Fields
- Select the Application Form tab and select the Application Form where you want to add fields.
- Select the Form Builder button/link.
- Add a New Section to the application by selecting the +
- Specify the Section Label.
- Determine the object you want to include as a Hidden Field.
- Drag the appropriate object card into the Section you created.
- Select the > next to the card to select individual fields from that object.
- Drag the field you want to include as a Hidden Field onto the form.
- Click the gear icon next to the field.
- Click the Hidden checkbox.
- Enter a Default Value for the field. This value will automatically be saved to the applicant's record.
- Click Ok to save your changes.

Adding Hidden Multi-Select Fields
Follow these steps to include a Multi-Select field as a hidden field:
- Select the Application Form tab and select the Application Form where you want to add fields.
- Select the Form Builder button/link.
- Add a New Section to the application by selecting the +
- Specify the Section Label.
- Determine the object you want to include as a Hidden Field.
- Drag the appropriate object card into the Section you created.
- Select the > next to the card to select individual multi-select field from that object.
- Drag the field you want to include as a Hidden Field onto the form.
- Click the gear icon next to the field.
- For Datatype, change Picklist to Text.

- Click the Hidden checkbox.
- Enter a Default Value for the field. This value will automatically be saved to the applicant's record.
- Click Ok to save your changes.

Adding Text Fields
The Element component allows you to add special messages, instructional text, images or links to application forms. The Element field is available in each Card.
- Within the Form Builder, select the Object Card where you want to add text.
- Navigate to or search for Element from the list of available fields.
- Drag the “Element” onto the appropriate Section of the form.
- Select the Setup icon.
- Update the Field Label to identify a label which will appear above the text (optional).
- Enter the text that you want to display. You can select different Headings, formatting, and alignment options. You also have the option to insert a picture, link or video.
- You can use the Visibility Condition to configure certain fields to appear or disappear depending on the data entered into the Application.
- Select Add Condition.
- Select the Object from the list of available values (e.g. Application).
- Select the Field from the list of available values (e.g. Application Type).
- Select the Operator.
- Indicate the Value that should be used (e.g. Graduate). The syntax displays below the Visibility Conditions.
- Select Ok.
- Add additional fields to your form as needed.
Adding a Link
Use the Element component to add special messages, instructional text, images, or links to application forms:
- Within the Form Builder, select the Object Card you will be using.
- Navigate to or search for Element from the list of available fields.
- Drag the Element onto the appropriate Section of the form.
- Select the Setup icon.
- Update the Field Label that will appear above the link (optional).
- Click into the text box.
- Select the Link icon
from the toolbar.
- Enter or paste the link you want to include on the application. By default, the link will open in the same window.
To update the link to open in a new window:
- Select the Setup icon for the Element
- Select the Link icon
- Click the html/rich text toggle: </>
- Replace target="" with target="_blank"
- Click Ok.
Example: <p>This link opens in a NEW window, <a href="https://help.liaisonedu.com/TargetX_Help_Center" target="_blank">TargetX Help Center</a>.</p>
- Select Ok.
- The hyperlink will be displayed in the Textbox.
- Select Ok.
- Continue building your form by adding fields.
Adding validations to format zip codes
You have a couple options for adding validation for the zip code field, depending on what you want to accomplish:
If you want to limit users to only be able to add Numbers in the Zip Code field:
- Convert the field type using Form Builder to a number. This would assure only numbers could be entered.
If you want to ensure that users can only enter the format #####-####
- Create a Validation Rule on the mailing zip/postal code so that it could only be 4 to 9 characters in that format. For details on Validation Rules, see the Salesforce Help & Training articles Validation Rules and Examples of Validation Rules.
Changing a Text Field to a Picklist
You can change a text field on the Online Application to a picklist if you want to limit what an applicant can enter/select.
Notes:
- Do not change a 'Checkbox' field to a Picklist field, as it will produce unexpected results.
- If you are using picklist fields, the value should match the valid picklist values set up in the TargetX aCRM.
- For additional information, see Converting fields in Form Builder.
- Add the Field you want to change to your application.
- Select the Setup icon.
- Change the Type field to Picklist.
- The Options section will appear.
- Select the
to add values that will be available to the applicant.
- Label will be what is displayed to the applicant.
- Value will be what is saved to the application record.
- Optionally, you can paste values for a picklist by selecting the Advanced Setup tab.
- Enter or paste values for the picklist, with each value separated by a new line.
- To include a distinct label for a picklist value, separate the label and value with a semicolon (Label;Value).
- Select Ok when all values have been entered.
Choosing which operator to use in your Online Application
Operators will vary depending on which Object was selected:
- (=) Equals - supports a single value, includes records that match exactly
- (!=) Does not equal - supports a single value, excludes records that match exactly
- (>) Greater than - supports numbers, dates, and text, including values greater than when ordered alphanumerically or by date.
- (>=) Greater than or equal to - supports numbers, dates, and text, including values greater than or equal when ordered alphabetically or by date.
- (<) Less than - supports numbers, dates, and text, including values less than when ordered alphanumerically or by date.
- (<=) Less than or equal to - supports numbers, dates, and text, including values less than or equal to when ordered alphanumerically or by date.
- Contains - supports a single value, includes records where the string is contained in the CRM field value.
When building conditions to evaluate a Text field, the condition is evaluated based on the alphabetical order of the field.
For example, if you set a Visibility Condition where the Last Name is greater than 'Sharp' to display an element, then the last name = 'Tuttle' will display the element while the last name = 'Gaines' will not display the element.
Autocomplete Fields
- Add a Field to your Online Application.
- Click on the Field Properties icon (gear icon) for the field to autocomplete.
- For Type, select Autocomplete.
- Select the appropriate Object, Field, and Value desired.
- You can set a default value for Autocomplete fields when there is no match to the student's typing, for example "Unknown School" for a School lookup:
- In the Autocomplete Setup section, paste the SalesForce ID of the desired default record into the Default field.
Note: If you want to change the label presentation on the application, you will have to create a formula field on the Account Object that uses the naming format you would like to display. Then, when adding the school picker field in app form mappings, you can change the Label Field API field to the formula field to display the naming convention.

Example:
IF( ISBLANK(TargetX_SRMb__ceeb_code__c) , (Name & ' (' & BillingCity & ', ' & BillingState & ')'), (Name & ' (' & BillingCity & ', ' & BillingState  & '; CEEB: ' &  TargetX_SRMb__ceeb_code__c &')' ))
Conditional Fields
A conditional field is a field that becomes visible based on the value entered in another field. For example, you can configure the “Ethnicity Other” field to display only if the “Ethnicity” field has a value of Other entered. Follow these steps to configure a Conditional Field:
- Select the setup icon for the field you want to be conditional. In the above example, you would select the “Ethnicity Other” field since we want to only display that field if a particular value is selected.
- Select the Add Condition button.
- Select the Object from the list of available choices.
- Select the Field from the list of available choices.
- Indicate the operator to be used.
- Enter the Value for the Field that will reference this group. (e.g., ‘Other’)
- Select Ok.
- Save and Preview the application and verify the “Ethnicity Other” field displays as expected.
Option Groups
An Option Group is a picklist for a field that changes based on the value entered in another field. For example, you can configure the picklist for a “Major” field to differ based on the applicant’s response to a “Desired Degree” question.
Notes:
- Option Groups can only be used for picklists (Option Groups WILL NOT WORK with radio buttons).
- If a restricted or global picklist is updated with new values, you must remove and re-add the picklist field to Application Form.
- If users want to select no value (ie, NULL) after they've selected a value in a radio button, they can use SHIFT + click to deselect the radio button.
- If you are using picklist fields, the Value should match the valid picklist values set up in the TargetX CRM.
- Add the Field you wish to make dependent to you Application Form.
- Select the Setup icon for the field you want to be dependent. In the above example, you would select the “Major” field since we want the list of Majors to change depending on the Degree selected.
- Enter the labels and values for the first scenario. For example, the first scenario might be the list of majors when a degree of ‘Associates’ is selected.
- Select the Add Group button. This will add a section called ‘Option Group 1’ field at the top of the list of values.
- Select the Add Condition button.
- Select the Object from the list of available choices.
- Select the Field from the list of available choices.
- Indicate the Operator to be used.
- Enter the Value for the Field that will reference this group. (e.g., ‘Associates’)
- Select the Add option group button again to add another scenario section, in which you can add the details for another degree. Repeat steps 4-8. Adjust the list of available values as needed.
- Select Ok.
- Save and Preview the application and verify the “Major” picklist works as expected.
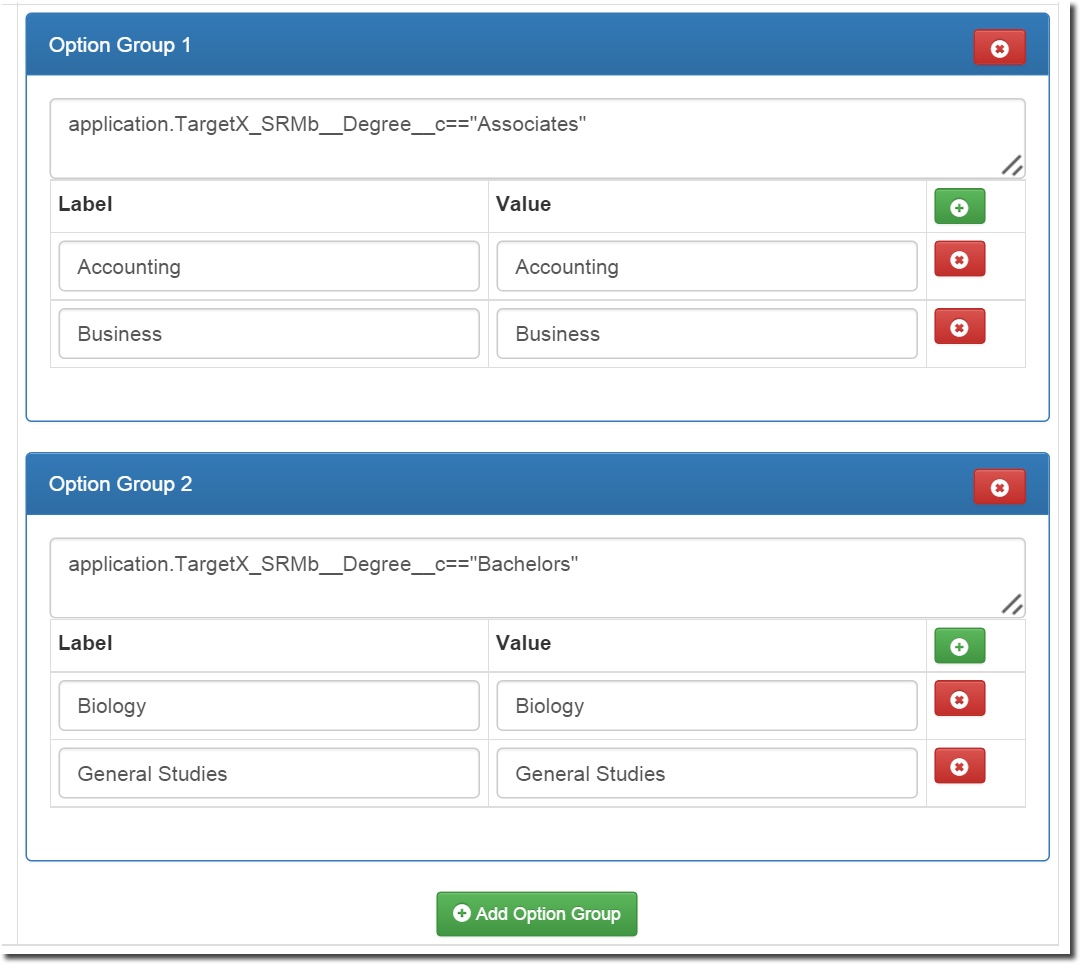
Above is an example of a conditional picklist for ‘Major.’ In this example, when a Degree = Associates only the Accounting or Business majors will be available. If Degree = Bachelors only the Biology or General Studies majors will be available.
Visibility Conditions
- Within the Form Builder, select the Object Card where you want to add a visibility condition.
- Select the field you want to use from the list of available fields.
- Select the Setup icon.
- Select Add Condition.
- Select the Object from the list of available values (e.g. Application).
- Select the Field from the list of available values (e.g. Application Type).
- Select the operator.
- Indicate the Value that should be used (e.g. Graduate). The syntax will display below the Visibility Conditions.
- Select Ok.
- Save your Application Form.
And/Or logic can be indicated by selecting AND (&&), OR (||) for each group of conditions entered.
Notes:
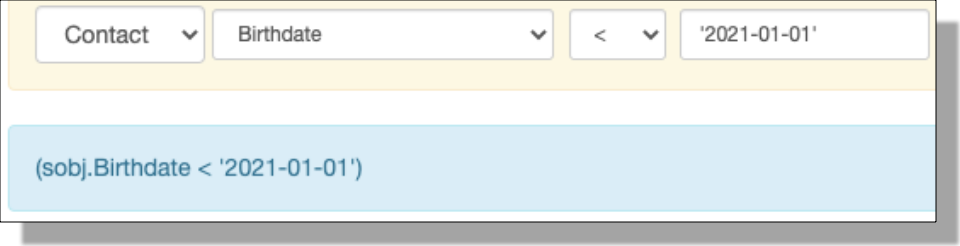
- When using Dates in Visibility Conditions, you must wrap the date in quotes, for example:
Configuring Required Fields
- Select the Application Form tab and select the Application Form where you want to add required fields.
- Select the Form Builder button.
- Add the field you want to set as Required.
- Select the Setup icon next to the field you want to set as Required.
- Click the Required checkbox.
- Save your changes.
Notes:
- Any fields added to your application which are required within your Salesforce schema must also be set as required within the application form.
- Only mark a field on a child object as required in the SF schema if you are saving that value as a hidden field on the card in the online app. Otherwise, if you want a field to be required you must do the following:
- Make the field required on standard SF layouts.
- Make the field required by Form Builder in the Online App.
- Do not set a validation rule in the SF schema that makes it required in all circumstances.
- Either do not put a validation rule in the SF definition of that field, or
- Put a validation rule in the SF schema that makes the field required except for the profile of the community user associated with the online app.
Configuring the Address Widget
The Address Widget will auto-format addresses in the Online Application and populate state/province as needed for different countries.
- Drag the Address Widget onto your form.
- Select the Setup icon.
- In the Select Object field, indicate where data will map to: Contact or Application.
- Indicate whether the Address Widget should be Required or not.
- For each field, select the Field where you want the data mapped.
- Specify any Visibility Conditions.
- Select Ok.
Additional Resources:
Configuring the Submission of Attachments
- Create/Open your Application Form.
- Select the Form Builder button.
- Select the Card button.
- Scroll to or search for Attachment and drag it onto your form.
- Select the > to the right of the Attachment object to add details.
- Select the Setup icon for the Attachment section.
- Enter the following and select Ok:
- Label
- Allowed File Types - the types of files an Applicant is permitted to attach. For each file, use the following format: .[type extension]. If you want to list multiple types use a pipe | to separate the formats. For example, if you will accept Microsoft Word documents OR PDF files you would enter the following:
.docx | .pdf
If left blank, any file can be uploaded.
Note: Allowed File Types are CASE SENSITIVE. So, if you specify .pdf and a user uploads a file as .PDF, they will get an error. As a workaround, you can specify both cases for each file type:
- For example, .pdf|.PDF
- Max File Size (MB) - the maximum size for an individual file that can be attached. If left blank, a size limit of either 25 MB or 3MB will be enforced depending on your Online Application Settings.
- Max Count - the maximum number of Attachments that an Applicant can submit. If no restrictions apply, enter 0.
- Min Count - the minimum number of Attachments that an Applicant can submit. If no restrictions apply, enter 0.
- Specify Filter Criteria - Anytime you use an attachment, you should include Filter Criteria for the upload fields to display properly.
Notes:
-
Attachments should not be added to READ-ONLY cards.
-
Attachments can not be added to the Application/Contact card.
-
The types of documents you allow will NOT be displayed to the Applicant. You should add an Element to indicate the Types of documents you accept.
-
Filters on attachments cannot contain parenthesis, e.g. (Masters).
Salesforce Lightning
-
Content Document is an attachment type that is generated in Lightning Experience. The App Reader will include Notes and Attachments classified as Content Document type.
-
Numerous artifacts (i.e., internal images) for TargetX packages are currently stored in the Documents object. The Documents object is NOT accessible in Lightning, as Salesforce has replaced Document object records with File object records. You must 'Switch to Classic Salesforce' to manage these artifacts. For additional information, please see Overview of Salesforce Lightning Experience with TargetX.
Configuring the Submission of Essays
- Create/Open your Application Form.
- Select the Form Builder button.
- Select the Object button.
- Scroll to or search for Essay and drag it onto your form.
- Select the > to the right of the Essay object to add details.
- Select the Setup icon for the Essay section.
- Enter the following and select Ok:
- Name
- Max Count - the maximum number of Essays you will allow a student to submit. If NO restrictions apply, enter 0.
- Min Count - the minimum number of Essays a student must submit. If NO restrictions apply, enter 0.
- Specify any Filter Criteria.
-
Drag any of the available Essay fields into the new section.
Converting fields in Form Builder
Using Form Builder, you can 'convert' certain types of fields to another type. You might want to do this if you wish to limit what a user can enter into a Field for data integrity:
- Select the Application Form tab and select the Application Form where you want to convert a field.
- Select the Form Builder button.
- Add the field you want to convert.
- Select the Setup icon next to the field you added.
- In the Type field, select the new type for the field to display. For example, choose Picklist if you want to change a Text Field to a list of specific values.
Notes:
- Text Fields can be set to any type.
- Picklist fields can be set to any type.
- Checkbox fields can only be set to one of the following: Picklist, MultiPicklist, MultiCheckbox or Radio.
The following field types can not be changed:
- Time
- Phone
- Percent(18, 0)
- Number(18, 0)
- Currency(18, 0)
- URL(255)
Custom Picklist fields
When you create a custom picklist field in Salesforce, the “Restrict picklist to the values in the value set” and “Use Global Picklist Value set” are selected by default:
When you create a custom picklist field in Salesforce, the “Restrict picklist to the values in the value set” and “Use Global Picklist Value set” are selected by default:
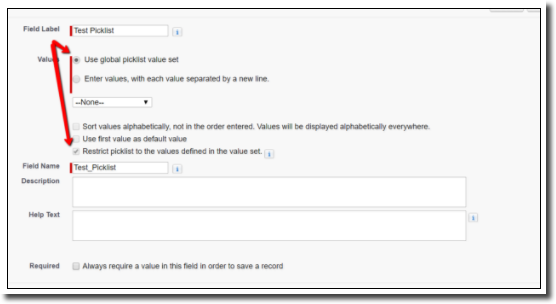
This will prevent a user from editing/adding to the picklist values in Salesforce and Form builder, as it applies the restricted picklist rules to that field.
If you want users to be able to edit/add values in Form Builder, select the “Enter values, with each value separated by a new line” checkbox and the “Restrict picklist to the values in the value set”:
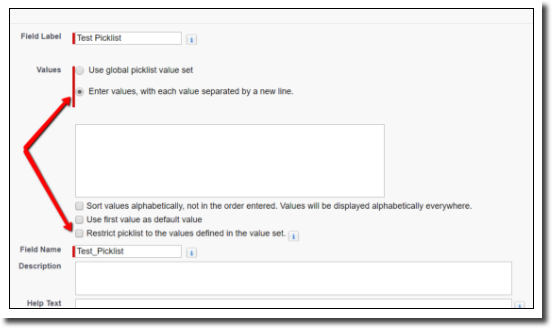
This will allow users to add picklist values in Salesforce and Form Builder.
Recommended attachment types
The following are recommended attachment types for use in Online Application. Using attachments outside of this list is supported, however, they will not display in the Application Review tool:
- BMP
- DOC
- DOCM
- DOCX
- DOTM
- DOTX
- GIF
- JPEG
- JPG
- PNG
- PPT
- PPTX
- RTF
- TIFF
- TXT
- XLSX
For details on size limits and Salesforce-supported types, see the Salesforce Help & Training article Attach Files to Records.
Displaying a video
- Navigate to the Online Applications tab.
- Click the Application where you want to add a video.
- Select Form Builder.
- Navigate into the section where you want to place the video.
- Locate the Element object and drag it onto the section.
- Select the Setup (gear) icon.
- Enter a Field Label.
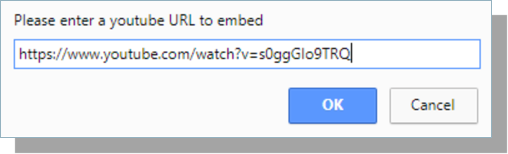
- Click into the Content area and select the Insert Video icon:
- Paste in the link to your video and choose Ok:
- If your video does not display a preview, select Toggle HTML.
- The link should BEGIN with https://
- If the 's' was removed, red-add it. You should be able to see a preview of your video in the Content area:

Displaying existing applicant information
You can configure applications to display any existing child record of Contact (e.g., enrollment history, tests) so that applicants do not have to submit the same information twice.
- Navigate to an Application Form.
- Select the Form Builder button.
- From the Object list, select an object which is a child record of Contact.
- Select the > icon to expand the card.
- Select the ‘gear’ icon to set attributes to the following:
- Read Only = checked
- Data Source = select Contact.
- You can include a Visibility Condition if you only want the information to display in certain conditions.
- You MUST include Filter Criteria to display specific child records.
Notes:
- If the filter criteria have no matching records, the card will not display to the applicant.
- This will display records that are NOT associated with the current application, but are associated to the Contact.
- READ-ONLY cards do NOT support the use of attachments.
Important: when using reusable cards to display existing applicant information, you'll need to complete the following to avoid display problems/errors:
- Add a second card of the same type (e.g., Enrollment History).
- Add a visibility condition that will never display that card (i.e., make the card always invisible).
- Add filter criteria to satisfy the Application Form requirement.
Displaying Text from a Formula field
- Navigate to the Application Forms tab.
- Select the Application Form you want to update.
- Within the Form Builder, select the Object Card which contains your formula field.
- Navigate to or search for your formula field from the list of available fields.
- Drag your formula field onto the appropriate Section of the form.
- Select the Setup icon.
- In the Type field, select 'Static Text.'
- Save your changes.
Mapping Checkbox fields in the Online Application
You can add Checkbox fields to an online application as hidden fields that have a default value of Checked to trigger checklist item matching. For example, for Application Requirements Manager, we map the 'Applies to Requirements' checkbox from the Recommendation object to trigger checklist item matching.
To create a Custom checkbox that defaults to checked, follow these steps:
- Select the Application Form tab and select the Application Form where you want to add a hidden checkbox.
- Select the Form Builder button.
- Add the field you want to set as hidden.
- Select the Setup icon next to the field you added.
- Click the Hidden checkbox.
- In the Default Value field, set the checkbox to Selected.