Managing Interviews
Best Practices in Setting Up a Review Process
Video Overview
Overview
WebAdMIT allows you to create and assign Interviews for reviewers. Interview details are available when working with Lists, Exports, Scoring, and Email Templates as merge fields.
Once applicants have been assigned to you to interview, you can view your Interviews from the Dashboard. Interviews appear on your Dashboard until completed.
Gaining Access to This Feature
The Interviewing feature is available under the Management panel and access to this tool is controlled through Work Groups. You must have the:
- Configure Software permission to create and edit Interview templates.
- Manage Assignments and Interviews permission to assign Interview templates to other users and edit completed Interviews.
- View Other User's Assignment/Interview Results permission to view Interviews that have been assigned to other users for the same applicants you can view.
Creating Interview Templates
Once you create an Interview template, be sure to test it with one applicant to confirm it's configured correctly. You can make limited edits to Interview templates once they're assigned to applicants.
For the schedule, location, question, and remark sections, you can do the following actions:
- Click the green plus sign or red x/trash icon to add or remove entries.
- Enter a name for the entry. You can enter up to 255 characters (including spaces and punctuation) for each entry.
- Use the grip icon to drag and drop the entries into the preferred order.
- Select if the entry is active. If you deselect this checkbox, then the entry will not appear as an option when assigning Interviews to users or to users when they complete an Interview.
To create an Interview template:
- Using the Menu Bar, open the Management panel, then click Interviewing.
- Click New Interview Type.
- Enter a name.
- Select the associated programs. If you don't select programs when you create your Interview, your template is marked as deactivated. Once you reactivate it, the template will automatically have all programs selected. Additionally, if you deselect all remaining activated programs, the template is marked as deactivated.
- Add schedule information, if desired. You can:
- Select dates and enter start times.
- Enter a maximum seat number. This prevents you from over-assigning this date/time. You can leave this field blank, if desired.
- Select if you want to use locations, where you can record where Interviews occur (e.g., Room 121B, North Campus, Zoom, etc.).
- Select if you want to use questions (i.e., items you want the user to review for an applicant).
- Additionally, select if the user can enter a score and comment on the question. If using scores, we recommend you add the score range for each question to the question name; this helps remind the interviewer of the minimum and maximum value for each question (e.g., Quality of experiences (0-5 points), etc.).
- Select if you want to use overall scores. If you use questions, then select:
- Average of Questions to provide an average score across all question scores.
- Sum of Questions to provide a sum of all question scores.
- Enter by User to enter a score. Use this option if you are not using questions or if the overall score is not a direct calculation of the questions.
- Select if you want to use overall comments, where interviewers can enter their comments in a text box.
- Select if you want to use overall remarks, where you create a custom drop-down and interviewers can select what they recommend doing next with the applicant (e.g., offer admission, etc.).
- Be aware that the first remark in your drop-down is automatically selected for applicants. We recommend that you either enter instructional text, such as Select from below or Please choose one of the following, or leave the first remark blank so that an actionable remark is not the default selection.
- Enter instructions, if desired.
- Click Submit to save your template or Return to Interview Types to discard your template.

Managing Interview Templates
To manage existing Interview templates, click Interviewing from the Menu Bar.
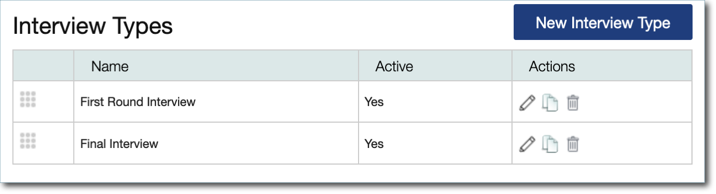
Reordering Interview Templates
Use the grip icon to drag and drop the Interview template into the preferred order.
Editing Interview Templates
Use the pencil icon to edit an existing Interview template. You can make limited edits to Interview templates once they're assigned to applicants. If you want to edit the whole Interview template, you must delete the Interview from all applicants first.
Copying Interview Templates
Use the duplicate icon to copy an existing Interview template. This allows you to take the existing template's settings and save them under a new name.
Deactivating Interview Templates
Use the trash icon to deactivate Interview templates. You can only deactivate Interview templates that are not assigned to applicants.
Working with Interviewer Availability
WebAdMIT allows users to configure which time slots they are available to conduct Interviews. You can adjust interview availability for yourself, or if you're in the WebAdMIT Administrators Work Group, you can adjust these settings for other users from the Admissions Users page. The calendar icon in the Admissions Users page only appears if Interviews were created/enabled, and availability can only be edited for the cycle you're working in.
To help you review everyone's interview availability, you can run the Interviewer Availability report in the Report Manager.
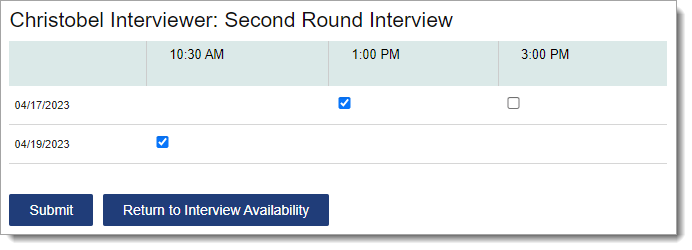
To adjust your interview availability settings:
- Click Account at the top right of WebAdMIT, then click Edit My Account.
- At the bottom of the My Account page, click Edit Availability.
- Click the pencil icon for the applicable Interview type.
- Select the days and times you're available to conduct Interviews. When assigning Interviews to applicants, you'll be grayed out for any dates/times that are unchecked here.
- Click Submit to save your changes or Return to Interview Availability to discard your changes.
Assigning Interviews
Once Interviews have been created, they can be assigned to applicants:
- Individually from the Interviews panel on the Applicant Details page.
- In batch via Lists, Searches, or the Clipboard.
Review the Gaining Access to This Feature section to learn which permissions you need to do these actions.
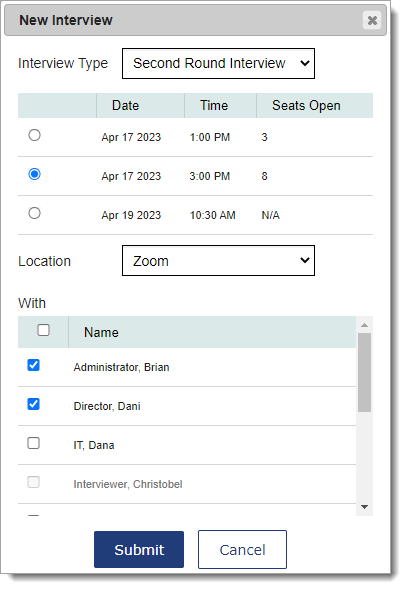
Assigning Interviews to Applicants Individually
- Navigate to the Applicant Details page.
- Go to the Interviews panel.
- Click New Interview. This button only appears when at least one Interview Type exists for the applicant's designation.
- In the window, select an Interview from the drop-down.
- Select the Interview date, time, and location. Applicants cannot view or select their preferred Interview date/time in WebAdMIT. Instead, contact the applicants separately to learn their Interview schedule preferences and then use the Interview template to record this information.
- Select who is to complete the Interview. You can assign it to multiple users by selecting the checkboxes. If an interviewer is not available, they will be grayed out.
- Click Submit to save or click Cancel to discard.
Assigning Interviews to Applicants In Batch
You can assign Interviews in batch through the:
- Search features using the Search Actions button.
- Clipboard feature using the Clipboard Actions button.
- List Manager using the List Actions button.
You can exclude applicants from your batch assigning by unchecking them before initiating a batch update. Warning: batch assigning Interviews can’t be undone in batch. Confirm that your search results and selections are accurate before performing the change.
Follow the steps below to assign Interviews in batch through the List Manager; you can follow similar steps for the Search and Clipboard features.
- Using the Menu Bar, open the Applicant Lists panel, then click List Manager.
- Click on a list name to run it.
- Click List Actions.
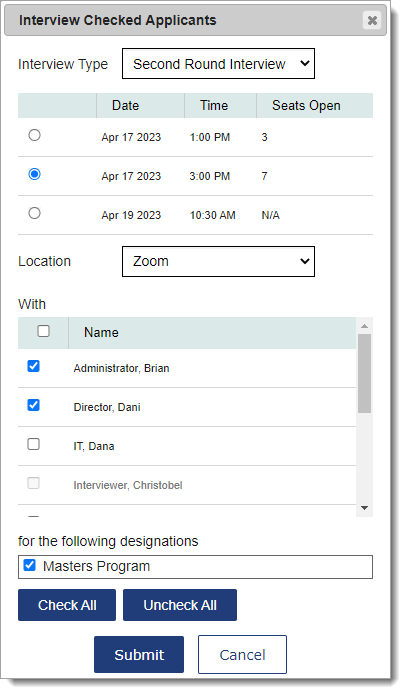
- Click Interview Checked Applicants.
- In the window, select an Interview from the drop-down.
- Select the Interview date, time, and location. Applicants cannot view or select their preferred Interview date/time in WebAdMIT. Instead, contact the applicants separately to learn their Interview schedule preferences and then use the Interview template to record this information.
- Select who is to complete the Interview. You can assign it to multiple users by selecting the checkboxes. If an interviewer is not available, they will be grayed out.
- Select the designation(s) you'd like this change to impact.
- Click Submit to save or click Cancel to discard.
Using Interview Merge Fields in Email Templates
Once you assign Interviews in WebAdMIT, you can use merge fields in the Email Templates feature to communicate interview details to applicants easily. See Creating Email Templates to learn how to use merge fields, and be sure to review Interview merge field behaviors so you can format your email correctly.
Submitting Interview Results
Video Overview
Completing the Interview
Once applicants have been assigned to you to interview, you can view them from the Interviews panel on the Dashboard.
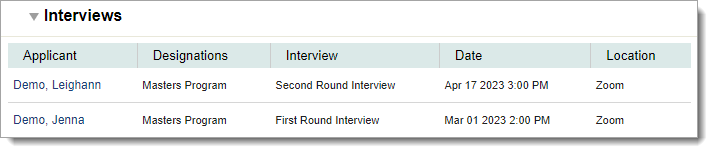
Clicking an applicant's name takes you to their Applicant Details page, where the Interview results can be submitted.
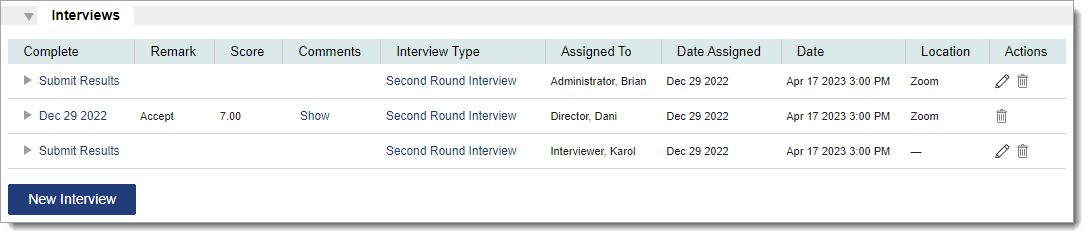
- Navigate to the Applicant Details page.
- Under the Interviews panel, click Submit Results.
- Enter scores and comments, where applicable. If scores are enabled, the individual question score is required. Depending on the Interview's configuration, overall scores are calculated by a sum or average of the question scores, or they can be entered independently by the interviewer.
- Enter overall comments and overall remarks, where applicable.
- Click Complete interview to submit your responses or Save without Completing to save your input for future edits.
Managing Incomplete and Completed Interviews
Once an Interview is assigned to a user, you can make select updates. Review the Gaining Access to This Feature section to learn which permissions you need to do these actions.
Editing Incomplete Interviews
Use the pencil icon to edit incomplete Interviews, including reassigning the Interview Type, interviewer, date, time, and location.
Editing Completed Interviews
Click the date link under the Complete column. Once you finish your edits, click Update interview Results.
Deleting Incomplete and Completed Interviews
Use the trash icon to delete Interviews.
Searching for Interviews
The Search Interviews page allows you to search by Interview-specific fields. Only applicants you have permission to view will appear in your results.
- Using the Menu Bar, open the Applicants panel, then click Search Interviews.
- If filters are hidden, click Show Filters to display them.
- If desired, apply one or more filters to refine the list of search results. In some drop-downs, you can search by Any Value and None.
- Click Search to view applicants or Reset Criteria to clear your filters.
Once your search is complete, click Sort Results to sort your results by name, email address, and ID number.

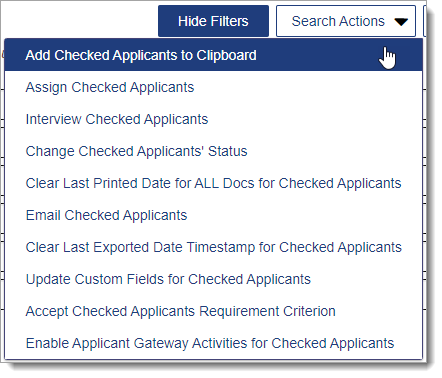
Applying Search Actions to Selected Applicants
Use the checkboxes in the first column of your search results to select multiple applicants and apply an action. The options you see are limited to your Work Group permissions.
- Add Checked Applicants to Clipboard: add the selected applicants to the Clipboard.
- Assign Checked Applicants: assign the selected applicants to a specific admission user (this function only appears if Assignments are configured).
- Interview Checked Applicants: create an Interview for the selected applicants (this function only appears if Interviews are configured).
- Change Checked Applicants' Status: change the Local Status for the selected applicants (this function only appears if Local Statuses are configured).
- Clear Last Printed Date for ALL Docs for Checked Applicants: remove the Document Last Printed date recorded in WebAdMIT for the selected applicants.
- Email Checked Applicants: send an email to the selected applicants.
- Clear Last Exported Date Timestamp for Checked Applicants: remove the Last Exported date recorded in WebAdMIT for the selected applicants.
- Update Custom Fields for Checked Applicants: update the custom fields that have been defined for selected applicants (this function only appears if Custom Fields are configured).
- Accept Checked Applicants Requirement Criterion: select a requirement and update the response to that requirement for the selected applicants (this function only appears if Requirements are configured).
- Enable Applicant Gateway Activities for Checked Applicants: activate the pre-configured Applicant Gateway activities for selected applicants (only available for select CASs; this function only appears if Applicant Gateway activities are configured).
Warning: enabling Applicant Gateway Activities and Assigning/Interviewing Checked Applicants are advanced functions that can’t be undone in batch. Confirm that your search results and selections are accurate before performing the change.